Tuesday, December 16, 2008

Awesome Textures for Art and Web Design

Delicious 0
Texture is the most important in art design, web layout, because it's your background, the background is cool, your design is professional. Today, i make a small collection of some textures i thought they are the most awesome and maybe helpful for you. All of them are free, you can download all without purchasing. If you know any else, please make an addition.


Sunday, December 14, 2008

Some helpful tutorial videos CSS & XHTML from beginning to advance

Delicious 0
After lost of email from visitors to me about questions: "How can you do that? ...", "Where can i find it...", "It doesn't work, please help...." I totally know that someone need to understand how the css works and the css rules can work without. These videos bellow i checked all and right now, i think it helpful for everyone who want to learn css and just begin to designning XHTML & CSS. From beginning to advance, you should not miss them.


1. Understanding Divs, Css, and How They Work Together by Ethan and Adam

 If you are new to XHTML, you should not miss this video. This video will help you understand how DIVs and CSS work together. The tutorial work on Dreamweaver and with this, it's more easier to follow what the author was doing. In this website, you can find other videos, maybe useful for anyone who is beginner with CSS, Web layout in PTS...

See video


2. Create a Fully CSS Website Layout by Nathaniel

The most famous people in Youtube about posting Design Tutorial Videos. In this video, you will see how to design a complete basic website layout with css, learn all about using divs, creating CSS rules, targeting divs, creating a background, and so much more! And there are other videos in his website helpful for designer. Check it all!

See video


3. CSS Tips & Tricks series by Stephen Korecky

Not a big collection but this series is helpful for you, who want to learn CSS  Tips and Tricks that users on over the internet are doing. This series contains 8 episodes and maybe continue to update. Check it now, and you will find something really cool in css.

See video series


4. How to Convert a PSD to XHTML by Jeffrey Way

This video is a complete tutorial from PSD slicing and CSS styling... You can see how he did this video with PST, Visual Studio ... He said this movie will shows you exactly how to convert a PSD into perfect XHTML/CSS. Yes, i think so.

See video


5. Converting a Photoshop Mockup by Chris Coyier

The video below is a part two of series made by Chris Coyier after lots of great feedbacks he received with part one right here. Because of part one is just 10 minutes lenght, he did the part two and in the great video he did, he show you everything, exactly how he created the CSS-Trick layout, but it's just a mini-version of the current version of CSS-Tricks.

See video 

Sunday, December 07, 2008

Improve your css skill, right now!

Delicious 0
Styling css is just follow the rules, if you run with the rule, you can get a good working, but sometime, you forgot that in these rule, you miss something that can make you better in styling css. This entry is just a bit experiences i got and i want to share with you. It'll help you not much but without that, your design can not be better.


Just change the values inherited from body

You can save your time when design css and make the css style look simple, easy to read and easy to edit by define all HTML tags you'll use in css style. When you use each tag in different cases, you dont need to re-style it, just re-use it with changing some properties you want. And you need to understand that in css, most of HTML tags will inherit properties from body tag, so that, just one time define in body tag, just  change value of properties when you use tags: h1, h2, span, p, div...

body {
 background-color: #fff;
 color: #333;
 font-family: "Lucida Grande", "Lucida Sans Unicode", Arial, Verdana, sans-serif;
 font-size: 12px;
 line-height: 18px;
}

h1 {
 font-size: 24px;
}


Group HTML tag selectors in one style

With some tags like html,body,div,ul,ol,li,dl,dt,dd ...similar properties, you can group that all into one style, save your css size, save your time... And when you use it somewhere in your css, you dont need to replace the same style in so many selectors.

html,body,div,ul,ol,li,dl,dt,dd,h1,h2,h3,h4,h5,h6,pre,form,p,blockquote,fieldset,input {
 margin: 0;
 padding: 0;
}


Target css property in each Web Browser

You know that sometime, each web browser will display your css differently. When you add property like margin-left to your selector, maybe Firefox margin exactly but maybe IE do nothing. How to resolve this problem? Follow this example below:

#box {  
   margin-left: 20px; /* all browsers including Mac IE */  
   *margin-left: 22px; /* IE 7 and below */
   _margin-left/**/:/**/ 18px; /* IE 6 only */  
}

With this solution, you can target your css property to each web browser if something went wrong with any web browser displaying. Read my entry here to find some tips about css in IE.


Use short rule in one selector.

In CSS2, you can use the short rule, this is much better when you are a lazier. Some time, when i design css with Dreamweaver, i automatically generate the background for a selector like this:

#box {
 background-attachment: fixed;
 background-color: #fff;
 background-image: url(images/header-bg.gif);
 background-position: left top;
 background-repeat: repeat-x;
}

But you can do it by following rule:

#box {
 background: #fff url(images/bg.gif) repeat-x fixed top left;
}

and this below is rule for font:

h3 {
 font: 1em/1.5em bold italic small-caps verdana,serif;
}


Whenever out-line css style is a big mistake

Don't ever think everything you can style css in out-line style by set attribute for HTML tag like class, id. I think give you an example help you get better than saying a lot. This mistake is not a big problem, but it make your design poor and look not professionally.

By normal, you do a menu separated by a border like this:


ul li {
 display: block;
 float: left;
 margin: 5px;
 border-right: solid 1px #000; 
}

You think it's ok? I'm fastidious and i really don't like at the end of menu, it has one | odd. And now, you need to style in-line it by do HTML like this:

<ul>
    <li>Text 1</li>
    <li>Text 2</li>
    <li>Text 3</li>
    <li style="border-right: none;">Text 4</li>
</ul>

You can do that tip when you have close DIV tags and don't want it double border size, just remove border at the close side from one of two.


Write your css with Alphabet and Paragraph and Commenting

I know that it not difficult to find and edit your css seletors, with any css design application, you can easy find your one css selector you want to edit by using finder feature(normal use hot key Ctrl + F). But formating your css is a good skill you need to have as a habits. Something will like this below:

/* IMAGES */
img { 
 border: 0;
}

img.across { 
 margin: 2px 0 16px 0; 
}

img.left { 
 float: left; 
 margin: 2px 20px 16px 0; 
}

img.right { 
 float: right; 
 margin: 2px 0 16px 20px; 
}

img.flushleft { 
 margin-left: -20px; 
}

img.flushright { 
 margin-right: -20px; 
}

So, you know, css maybe easy to learn, but it's not easy to use, and using well is more difficult. Keep your good working in css by train yourself and improve your css skill, right now!

Saturday, December 06, 2008

Contact form for Blogger users by Formspring

Delicious 0
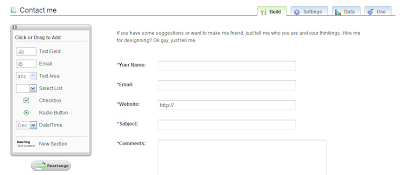
Blogger is the most powerful blog provided by Goolge. Everything is ok, Blogger supports so many useful tools for you to publish your blog, but you know, Blogger did not provide the form in your blog that vistors can contact you. When you run your blog, just for fun or for living, you should know that you need to receive suggestions from your visitors to help you build blog better. So now, you don need to wait for Blogger supports this. I found you a useful tool to create your own nice contact form with FormSpring.


1. Register your own account in FormSpring

For contact form, you just need to register your account with Free Plan. If you want visitors send you a file, you need to upgrade your account to Personal Plan and above.

Follow this link to register with FormSpring. This form for register is easy to done and you dont need to provide so many informations. When your account was created, you need to active your account by validating your register's email. Just do it.

2. Create your form.


Because FormSpring allow users create form by drag and drop, creating form is easy to do. In your fee account it allow you to create your own form contains: TextField, TextArea, Select List, CheckBox, RadioButton. Specially, FormSpring provide you Email Field with auto validate email inputed and the Day/Time select. Bu i think, when you attach this form into your blog, you should hidden this Day/Time field and the value is current day.

The CAPTCHA feature is not supported in Free Account, just upgrade your account if you want to prevent spam from visitors.

In the Setting tab, you can choose style for your form in General section, with free account, you dont have access features: Confirmation users email when submitted, CAPTCHA, Payment Integration. But you can collect all datas from users submitted into database of FormSpring's account for management.

3. Integration FormSpring form into your Blogger layout:

Click on the Use tab, you will see some ways to integration your form into Blogger layout

URL Link: To link to the form from another web page or to send 
the form via email.
Javascript: To embed the form in an HTML page, jut copy and 
paste the code.
HTML: Use the form with full HTML.
Form Forwarding: Using default value of form and customize 
the form yourself.


And now, you have to choices when integrate FormSpring with your Blogger.

URL Link: Just create one link in your Blogger layout and when users click this link, they will be transfered to your form in FormSpring website.

Embed code into your blog: You know, you can not create your own page in Blogger, you just only allowed to create blog entry. But this is enough, now, create one entry, the title is up to you(such as: "Contact me", "Feedback" ...) and the content, dont enter anything, you need to work in Edit HTML tab, embed this form by Javascript like me here or use Form Forwarding and customize stysheet yourself. With javascript embeding, you dont need to do anything, just copy javascript code of your form and paste it into your entry, and everytime you change style or structure of the form in FormSpring, the form in your entry will be automatically changed (i like it :D). The Form Forwarding is greate for you if you want to customize the code, css blend with your website color, if your content background color is White, i think just Javascript embeding is ok.

Publish your entry now, and you will see the result. The form is great, and now, visitors can send you feedback, contact you....


4. Problems when Integration FormSpring with your Blogger.

Doubling the title of form:
When you embeded the code into your blog entry, what will happen? You will see that it have two title: one is your blog entry title, and one is your form heading, it makes your form is not professionally, right?


OK, log in to your FormSpring, select the form your want to edit, remove the heading of form by leave the heading blank. And now, you fixed it.


The form is terrible with the google ad in your blog entry:
You display the google code in your each blog entry at the top post body? And when you publish this form, it is an entry, so that it will display the google adsense code, too. Remove it by css now, at first, your need to change some thing in your Blogger Layout.

Check the check box "Expand Widget Templates" to display all layout content. Find the google adsense code:

<data:adEnd/>
<data:adCode/>
<data:adStart/>

replace with

<div class='ads'>
<data:adEnd/>
<data:adCode/>
<data:adStart/>
</div>

Add this code to your body tag

<b:if cond='data:blog.url == &quot;URL of your contact form&quot;'>
<style> 
.ads {display: none;}
</style> 
</b:if>

And now, blogger layout will know that, when the visitors access to this form page, It will now display the Google Adsense code.

If you have any problem when adding FormSpring into your Blogger, just leave the message here, nice to help you all build a great Blogger.

Monday, December 01, 2008

Enable OpenSSL in Apache with WAMP 2

Delicious 0
Before starting this entry, i know that there're many post over internet talk about it. You can simply google with some keywords like: "wamp enable ssl", "running ssl in apache wamp" .... and you will find a lot of topic guide to run Open SSL in Apache with WAMP. This post is not explain how to config OpenSSL in Wamp2, it's just a entry that will resolve some problems when you did but it not worked.


Wamp is the best i know how to make simple about running Apache, MySQL, PHP. But i dont known, why did wamp display option to enable OpenSSL in Apache but users must config a lot to make it work. So, i know that, if you want to enable OpenSSL in Apache server, you must create your one certified key, but if you not config some in httpd-ssl.conf, SSL will not work. However, at this moment, there are still no post step by step how to make the OpenSSL in Wamp server work by Wamp Staff, there're only from user who did make it work before.

Why i checked the syntax of httpd.conf ok, but it still not work.

So, you know, you must both correct syntax of 2 config file: one of Apache Server(httpd.conf), one of OpenSSL in Apache(httpd-ssl.conf).
When you checked httpd.conf syntax, it said OK, but make sure that you configed httpd-ssl correct syntax.

How to check httpd-ssl.conf syntax?

With httpd.conf file in "C:\wamp\bin\apache\apache2.2.8\conf" folder you can check syntax by following command from command prompt of Windows:

httpd –t

But with httpd-ssl, you can not do that, and there no file for using. But you know, httpd-ssl.conf file is included in httpd.conf, and when you run Apache, it will say something that cause ssl not worked. You can check error logs in logs file that you customized in httpd-ssl.conf file, but sometime, it dont say anything about error. If can not start Apache from wamp admin control, you should try to start it by command.
 Using the command prompt, run:

httpd

And now, you can check the errors of Apache and causes make ssl not work and failure to start Wamp Server.

Some errors and causes

It said:

.. could not bind to address 0.0.0.0:443 .. 

Some users say that if you can not enable OpenSSL in Wamp, try to add follow command in httpd.conf

Listen 443

or

Listen 443 https

But i dont think so, just remove it, and you will resolve the error above.

It said:

.. Useless use of ... in line .. 

If it said it's useless, just remove it ^^

And when you run Wamp Server, make you that in your computer does not have any other web server such as: IIS, Tomcat with port 80.... and some programs such as: Skype, Norton, McAfee ... that are using port 80. Just need to change Apache listen port to other(such as 8080) if you dont want to stop or remove programs above.

Good luck!

Sources